Wednesday 14 December 2011

End of Semester Cheer

Well I did it I survived through my most recent semester of college, and it feels so good to be off for a couple of weeks of no school.

But I will not be sitting around drinking egg nog this holiday season.  I have many plans for my time a way from all that fancy book learning; including a workbench for my dad (which I started as soon as I got home from my last exam), some game boards and what I am most excited for is the Woodwhisperer Guild Build (more on this to come).

The bench I am building for my dad is a simple plywood constructed work surface for the garage.  My dad needs a place to work when tinkering with his motorcycle, so the bench is a basic platform to put stuff down.
The Torsion Box Top

The top of the bench is a torsion box.  I decided on using a torsion box because the stay incredibly rigid, and I felt like building one.  I like the process, and after so much school work the repetitive nature of building the box frame was a good way to let off some steam.

I was hoping to get further on the the project but some bad weather forced me back inside.  Maybe I' ll go down stairs to the shop and practise some dovetails now instead.

It's good to be back.  Cheers
Hans Christopher

Thursday 17 November 2011

Just Breath

Just Breath...Relax...It is going to be ok.  That what I tell people when I see that there stressed out about anything.  So why can I not for the life of me do the same thing when I get frustrated.

Inevitably when working some things go wrong or become difficult to do.  Working as a one man operation installing trim work (especially big crown moulding) can be rather frustrating.  I try and I to do things, that would be so much easier with another person or at least at clearer head,on my own.

On a recent millwork job in which I installed some store bought cabinets, new door casing, baseboard and crown moulding I shamefully admit that I lost my temper while working, packed up for the day and left work early.  Not very professional but with being so frustrated I felt like I was about ready to break something and I figured walking away was much better then damaging the work or my clients home.

So why couldn't I just breath and take a moment to collect my thoughts.

I think that there is so much emphasize in our world about making a quick buck that people rush always to get the job done.  Or (this is at least my case) feeling guilty about displacing people in there own home.  This recent job was a bedroom, and with demolition and painting and trim work it was necessary to ask the home owners to move into another room for a time, so I felt guilty about keeping them out of their own room because of how long the job was taking.

Should I rush to get them back into there room.  Should I take my sweet time to insure that I don't raise my heart rate at all.  Or should I just breath and take the time I needed and work as efficiently as possible. 

Now a few weeks later with a cooler head I can think back on the job and see what I could have done differently.  If I had taken the time to breath and think straight I wouldn't have lost a half day of work.  It seems that the rushing actually cost more time then it saved.

The situation isn't all bad.  The job was completed and looks good and the home owners are happy with the work.  And I learned somethings that I know I can use on future jobs.  Most important is to just breathe.

Cheers
Hans Christopher

Sunday 6 November 2011

A Wonderful Idea Hidden Beneath Misconceptions

We have too much stuff.  I see this now, and it bothers me how much stuff we have.  A few months ago when I read Chris Swharz's The Anarchist Tool Chest ( a book I highly recommend) the big idea I took away from the book was minimalism is a great way of life.  I do not know if Mr. Shwarz's idea was to sell people on minimalism, maybe the book would have been called the Minimalist Tool Chest then, however the idea of having a small collection of quality useful tools really stuck with me, and has thrown me down a strange rabbit hole.

I started thinking about the tools I own and use, and thought to myself that I am doing pretty good with only buying necessary items, so I felt pretty good.  Then I looked at other things in my life and tried to see if I was as minimal...nope.

I think that a lot of people have a misconception about minimalism that makes them  believe it is cold and borrowing.  Houses with no decoration, no detail and people that keep no stuff.  I think if you go back to the people who first thought of the ideas of minimalism their ideas may have been a little different.  I like to see minimalism as a way of living with the necessary things, and still being able to live efficiently and comfortably.  If you want to live in a house with detail and mouldings go for it.  The idea is to not live in excess to not let all the stuff get in the way of living.

People should be happy with the things they have and not consistently want more.  A hard thing to do considering advertising, marketing and media is always pushing people to buy stuff.

In closing on this topic I will say this.  Don't go through everything you own and through away everything that is not necessary to living.  Instead go through your stuff and get rid of the things that are not necessary to make you happy.  With less stuff in the house, room or office (shop for us woodworker people) there is more room to live, spread out and breath.

Cheers
Hans Christopher

Tuesday 1 November 2011

What about October

So after a short hiatus in the month of October I am back to blogging.  Lots of fun activities out of the shop, a mill work job and a death in the family made October a hard month to blog in.  Not to say I didn't get any work done I just didn't have the time to tell the Internet about it.  But I am back now, and am determined to get out producing content for every ones viewing pleasure.

As an aside Happy Movember everybody that magical time of the year where men (and some women maybe *shudder*) grow beautiful full mustaches to raise awareness for prostate and testicular cancer.  Due to a very rare facial hair condition (lets just call it boy face) I cannot grow any form of worthy mustache.  Instead I will simply be supporting the cause and helping to raise awareness via the blog and other social media streams.  So to you fellas out there growing the mustaches best of luck.

Talk to everybody again real soon.

Cheers
Hans Christopher

Wednesday 28 September 2011

A Dull Day

So I think it is about time I made the obligatory sharpening post.  Come one we've all done it we learn to sharpen and we get all excited and we want to brag about it to our friends...and random people on the Internet.  That's ok, now its my turn to share my method.

I am going to start by saying that I know how to sharpen and the way I sharpen my edges works.  This is not to say it is the only way to sharpen an edge (there are thousand...maybe...of ways to sharpen an edge) but my way works and works well.  I will show you the entire process of sharpening an edge using some Marples chisels I acquired recently, and boy could they use some love. 


The first step in establishing a sharp edge is the roughest and longest part of the process.  An edge needs to be true, but what is true.  The trueness of an edge is its consistency of flatness squareness and bevel along its entire length.  Not all of these factors are as important as you may think. 


A blade (be it chisel, iron or something else) should have as flat a back as you can achieve, but don't stress over this.  Find a reliable flat surface that will not distort over time to use when lapping the back of your blade.  When I first started started sharpening I used a piece of glass and recently switched to a piece of granite.  Something to keep in mind is that to get consistent results with your sharpening method you must remain consistent, if you change to a new lapping surface you should reflatten the backs of your blades on this new surface, more on why later.

Once you have a flat surface you need an abrasive to work the metal on.  I usually begin with some 120 sandpaper (I use norton 3x wood sandpaper).  Using the 120 sandpaper I work the blade back and forth along its length (to achieve scratches parallel to the long sides of the chisel) and do not stop till I have a consistent scratch pattern across the entire back. 
After the 120 I move up to 180 grit and work the steel until I cannot see any of the scratches created by the 120 sandpaper.  To see what my surface looks like I hold the blade beneath my desk light and look for a consistent reflection on the steel.  If I am having trouble seeing exactly what is going on I use a small magnifying glass to get a better look.

After the 180 I move onto 220 sandpaper and repeat the previous step.  Then I move onto 320, 400 and then 600.  The final result should be a consistent surface across the back that feels smooth to the touch.

How far up the blade you flatten is a matter of Steel hardness and time.  Over time as you resharpen the bevel of a blade you slowly work back up the blade.  If the steel is softer this process is faster and will require more area to be flat for the blade to remain flat over its life.  It is beneficial to flatten a back as few times as possible (each time you do it there may be small variances that can effect its previous flatness), so put in the time and effort and flatten as much of the blade as you can in the beginning.

The follow up steps involved in achieving a sharp edge will be posted in the weeks to come.  So if you want to learn how to get those edges super sharp stay tuned.

Cheers
Hans Christopher

Wednesday 21 September 2011

One Ugly Duckling

So with no school today I had the whole day to spend down in the shop.  I started by continuing on my sawbench.  I glued up the front legs and stretchers (wrong way first...I hate do overs), and while that was drying I continued onto some other shop projects.


I built a mitre shooting board a while back during the cabinet door project and now I have gone onto build a standard shooting board, and I screwed it up.  The issue is that when I was planning the end grain (planning sapele end grain is not as bad as I thought) I chamfered the ends of the fence block so now when I plane a piece up against the fence the work piece continuously blows out.  It is fixable so when I can I'll take off the fence and plane away the chamfer.

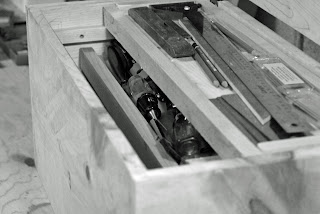
The big accomplishment today though was completing the ugly duckling.  What is this ugly duckling I speak of; well it is one ugly tool chest that I now having sitting in my shop.  The chest is a simple construction of all the spare junk I had in the shop, the chest is meant to hold and protect my complement of hand tools (or at least most of them).  It is 2'x1'x1' box made of pine and maple with two tool tills.


The chest holds:
Jack Plane
Jointer Plane
Block Plane
Router Plane
Shoulder Plane
Spokeshave
Brace & Bits
Hand Drill
Fret Saw
Beading Tool
Chisels
Mallet
Rasps & File
Scrapers
Marking Knife
Dovetail Markers
Square
Level
Ruler
Dividers
Measuring Tape
And other miscellaneous items

  
This chest is by no stretch of the imagination perfect, far from it.  The chest is a bit to small, I have none of my saws (besides my fret saw) in there which I would have liked.  The tills are a bit to large to allow for easy acces to bottom of the chest. The lid doesn't stop all the dust from getting into the chest.  For me these are some big issues that I should address either by retrofitting solutions onto the chest or by building a new one (probably the latter).  In the mean time the chest does work well enough to hold and protect my tools so it is a welcome addition to my shop.

Cheers
Hans Christopher

Monday 19 September 2011

Back In the Swing Of Things

This past week I went back to college, or at least I tried to.  A strike by the school's support staff has made going to classes very difficult.  Benefit of this was an extra week of summer vacation, and some more shop time.  Some nice additions to the shop this week include my first set of handsaws, my first marking knife and a new quality combination square.
I am very exciting about the two new saws.  With the addition of them there is almost nothing I cannot do now in the shop with only hand tools.  The two saws are a Pax rip saw and a panel saw.  Pax saws are hand made saws in Sheffield England and have been since 1776.  The saws are amazing, they are sharp and follow a line well (when user error does not occur).  Now with these saws I can break down rough stock which is the first step any project.
I also purchased a Starrett 6' combination square, and wow is it ever a square.  Previously I have been working with an old home centre 12' square, and it worked but not like this new one.  This square is  rugged it is built like a tank and  ready to work.
And finally I got my first marking knife.  This was not a necessary purchase, marking a joint with a pencil or an utility knife works just as well, but as hand tool woodworker having a marking knife is part of the tool kit, and I just like buying tools.  All of these tools I purchased from Lee Valley.

With the purchase of the two new saws I now have need for a saw bench so I can properly use my new saws, so I have begun work on one and will keep you updates as it nears completion.

Below are a collection of photos from my Italy trip.  These images are all of Statues within The Vatican.  Enjoy.

Cheers
Hans Christopher


Sunday 4 September 2011

Born Again

This last week sees the completion of my latest project and I couldn't be more happy with the result.  I originally believed that the piece was old growth pine, but after some research and the opinions of some of my fellow woodworking friends (big thanks to the guys over at the woodwhisperer live chat) I know am pretty certain the piece is made of chestnut.  A rare treat because chestnut is only available know as a salvaged material, because chestnuts were wiped out by a blight in the early nineteen hundreds.  Without further delay I present the finished dresser.


Well there you have it the completed dresser.

Cheers
Hans Christopher


Monday 29 August 2011

Resto...Ration Work Uses Up My Mana

First off if you get the opening title joke you are a nerd...and congratulations on that.

So as I hinted to on Wednesday I have begun a new project here in my shop. I am restoring an old, very old in fact, dresser.  My family has owned the dresser for around 45 years, but the piece is much older then that.  I could not find any dates written on the piece which would give me an exact date of the piece.  The construction type and finish on it leads me to believe that it is close to a hundred years old.  Also the piece just feels old, the old growth pine feels like it has existed forever and when you touch the piece it feels like it has lived a long life and could tell some stories.

One thing I have to say about having the dresser down in my shop is that "damn does it look good in there".  Not the dresser itself but the image of a completed piece of furniture was really cool thing to see in my shop considering this is the first time a whole piece has been on the shop floor.  I had to take a few minutes to stand back and just stare at the dresser. 


It was one of those moments where I was really excited about what I do and I cannot wait to see a piece of furniture I actually build sitting there just looking good.

So as you can see the dresser is very green.  A woodworking crime if you ask me, you will see later what I mean by this.  The whole thing is green even the solid brass hardware got a nice coat of green paint. So my job is to remove the paint and apply a new finish to make the piece look good as new.

A nice look at some of the details in the piece.  Round over and beads are the predominate details in the piece as well as some carved details.


To remove the paint I started by using a chemical solvent and applied it directly to the paint.  After it sitting the for 10 minutes I come back with a paint scraper and pull off the softened paint.  After that I go in with the paint scraper and a card scraper and remove all the remaining crud left.  Finally I hit the piece with 60 grit to try and expose as much fresh wood as possible, this was to help achieve a uniform finish on the piece when I went to apply stain later on.


To prepare the surface for finish I began with 120 grits sand paper and worked every surface of the piece.  Then 180 everywhere, and finally 220 on all exterior surfaces, I am not finishing the inside of the dresser so no need to go that high as well rarely will anyone see the inside.

And with the sanding all finished the piece is ready for finish.  I plan on applying a stain and a couple coats of a semi-gloss polyurethane.  Now if you excuse me I have a melon juice to drink (nerd joke again).

Cheers
Hans Christopher