Progress is continuing at Rosewood this week, learning to use various machines in the shop. My saw horses are coming along, but more on that in my next post.
A down side to working in a class of six is that there are not enough machines for everyone all at the same time, so in my spare time I have been using the open tools and some spare wood to build a panel gauge.
A panel gauge is a simple tool, a fence and an arm with a pencil is used to mark out large widths, like a large marking gauge.
Cheers
Hans Christopher
Showing posts with label Tools. Show all posts
Thursday, 24 January 2013
Thursday, 15 November 2012
My own shaving maker
After lunch it was back to the shop to assemble the plane. This process was invaluable as a learning experience. In the past my gluing up process has been very jump in and get it done. David tired to tame me of my wicked ways and explained the benefits of a proper dry run glue up and caul use.
Unfortunately I did not take a lot of pictures of this process sorry. During this process the alignment pins were invaluable; instead of worrying about lining all the pieces up all I had to do was focus on getting the cauls and clamps on.
After the dry run it was glue time. Another great tip from David was how to make a simple glue spreader with a piece of scrap wood and a few saw kerfs; I will definitely be making something like this for myself.
With the plane in the clamps it was on to shaping the plane hammer to go with the plane. For those of you who do not know small hammers (plane hammers) are used to adjust wooden planes. I roughed out the shape on the bandsaw and then over to the bench and refined the shape with rasps, files and spokeshaves.
And with that my first day was done.
Day two started nice and early as well more tea and beautiful weather made the shop even more spectacular.
First thing was to take the plane out of the clamps and see what I had. At this point the plane was more or less a big block of wood but it did look good. The next step was to set up plane for sole flattening. To do this I had to make a temporary wedge so to tension the plane as it is flattened: first on a jointer then on sandpaper.
With the sole flat the next thing was to make the final wedge with the plane iron. The fit of the plane iron and wedge is critical to the function of the plane. The wedge cannot be to tight or to loose and the fit must be consistent between the iron and the cross pin.
With the wedge done it was time to try taking a shaving.
After the initial test it was time to shape the plane. This part was fun: rasps, files, and spokeshaves.
After the shaping it was lunch time again, and after lunch it was time to play with the new plane. And with that my plane building experience was finished. The day finished off with some conversation between David and I.
A great experience and a wonderful learning experience. My deepest thanks to David Finck.
Cheers
Hans Christopher
Unfortunately I did not take a lot of pictures of this process sorry. During this process the alignment pins were invaluable; instead of worrying about lining all the pieces up all I had to do was focus on getting the cauls and clamps on.
After the dry run it was glue time. Another great tip from David was how to make a simple glue spreader with a piece of scrap wood and a few saw kerfs; I will definitely be making something like this for myself.
With the plane in the clamps it was on to shaping the plane hammer to go with the plane. For those of you who do not know small hammers (plane hammers) are used to adjust wooden planes. I roughed out the shape on the bandsaw and then over to the bench and refined the shape with rasps, files and spokeshaves.
Pinched in the tail vise and using a spokeshave
to shape the hammer handle
And with that my first day was done.
Day two started nice and early as well more tea and beautiful weather made the shop even more spectacular.
First thing was to take the plane out of the clamps and see what I had. At this point the plane was more or less a big block of wood but it did look good. The next step was to set up plane for sole flattening. To do this I had to make a temporary wedge so to tension the plane as it is flattened: first on a jointer then on sandpaper.
The plane blank just out of the clamps
With the sole flat the next thing was to make the final wedge with the plane iron. The fit of the plane iron and wedge is critical to the function of the plane. The wedge cannot be to tight or to loose and the fit must be consistent between the iron and the cross pin.
Using a block plane to fit the wedge
The finished wedge
With the wedge done it was time to try taking a shaving.
The very first shaving
The second shaving
After the initial test it was time to shape the plane. This part was fun: rasps, files, and spokeshaves.
After the shaping it was lunch time again, and after lunch it was time to play with the new plane. And with that my plane building experience was finished. The day finished off with some conversation between David and I.
A great experience and a wonderful learning experience. My deepest thanks to David Finck.
Cheers
Hans Christopher
Wednesday, 14 November 2012
Among Trees and Mountains
Here among the mountains and trees of North Carolina I was able to spend a few days working with one of the modern masters of woodworking. If you haven't heard of David Finck, please get out from beneath the rock under which you have been living, look him up on the Internet (<---- use the link here), read his book, spin around three times and spit...DONE...good. My apologies to the non woodworkers if insulted you; I do not really expect you to know David Finck or his work, still look it up its freaking awesome.
David studied at College of the Redwoods under James Krenov (again if you do not know James Krenov please repeat above procedure) and now builds fine furniture, guitars and offers workshops on woodworking at his shop in North Carolina. I was lucky enough to be in the area and to take a two day workshop with David on plane making. I had previously read David's book (which is amazing) on plane making (however it does talk about much more than just plane making) and wanted to build one of these planes, yet I was a little apprehensive about the procedure so I decide a one on one class would be just what I needed. And boy was it an amazing experience, I had an incredible time and learnt much more than just plane making.
Day one started nice and early on a rainy day (no better day then to be in the shop). Right off the bat David was incredibly friendly and hospitable with a nice pot of tea ready to go. With tea in hand it was off to the shop. My jaw hit the floor entering his shop, woodworking Nirvana: high ceilings, lots of natural light, gorgeous tools, amazing wood and drop dead beautiful furniture pieces.
First thing on the agenda was a little sharpening discussion and block plane setup. I wish I had been able to bring my own tools for this workshop but David was very kind and let me borrow his which was awesome.
The plane is made from some rift sawn red oak that came from David's late father (which for me is an incredible honour). David had the blank roughed out and ready to go, so the first task was to layout some lines and cut the front piece and back piece on the bandsaw.
Next up the drill press to drill some holes for alignment pins. These pins are merely an aid to help with the glue-up.
Next step was to rout a slot in the iron bed to allow for the chip breaker screw. David had a jig and router setup for which made this a breeze.
After the alignment pins the cross pin was next. In retrospect this was maybe the most complicated part of the whole build, but with a good set of directions and David's help it was no problem. With the hole drilled it was onto a bit of shaping to get the cross pin to fit in the holes and to make it look pretty.
With that all done the plane was ready for glue up after lunch.
Cheers
Hans Christopher
David studied at College of the Redwoods under James Krenov (again if you do not know James Krenov please repeat above procedure) and now builds fine furniture, guitars and offers workshops on woodworking at his shop in North Carolina. I was lucky enough to be in the area and to take a two day workshop with David on plane making. I had previously read David's book (which is amazing) on plane making (however it does talk about much more than just plane making) and wanted to build one of these planes, yet I was a little apprehensive about the procedure so I decide a one on one class would be just what I needed. And boy was it an amazing experience, I had an incredible time and learnt much more than just plane making.
Day one started nice and early on a rainy day (no better day then to be in the shop). Right off the bat David was incredibly friendly and hospitable with a nice pot of tea ready to go. With tea in hand it was off to the shop. My jaw hit the floor entering his shop, woodworking Nirvana: high ceilings, lots of natural light, gorgeous tools, amazing wood and drop dead beautiful furniture pieces.
First thing on the agenda was a little sharpening discussion and block plane setup. I wish I had been able to bring my own tools for this workshop but David was very kind and let me borrow his which was awesome.
Plane blank and assorted tools
The plane is made from some rift sawn red oak that came from David's late father (which for me is an incredible honour). David had the blank roughed out and ready to go, so the first task was to layout some lines and cut the front piece and back piece on the bandsaw.
The back ramp and front piece laid out with pencil
using a combo square and protractor
Bandsawing the two needed pieces
With that done it was time to true up the ramps so that the plane iron would rest perfectly.
Using a block plane to true the ramp
A strafing light to help judge the ramp surface,
its needs to be dead flat, and the light shows any
dips or bumps or rough spots
Next up the drill press to drill some holes for alignment pins. These pins are merely an aid to help with the glue-up.
Clamps hold the plane together when drill for the
alignment pins
Hand sawing and chisel parring to flush off the dowels
Next step was to rout a slot in the iron bed to allow for the chip breaker screw. David had a jig and router setup for which made this a breeze.
After the alignment pins the cross pin was next. In retrospect this was maybe the most complicated part of the whole build, but with a good set of directions and David's help it was no problem. With the hole drilled it was onto a bit of shaping to get the cross pin to fit in the holes and to make it look pretty.
With that all done the plane was ready for glue up after lunch.
Cheers
Hans Christopher
Sunday, 21 October 2012
Shop Tour
So I have decided that I am going to go out on my own and start my own carpentry company. I love all things woodworking so making it my career is a total no brainer to me, so stay tuned to see how that all evolves.
To make the transition to full time pro woodworker and not just a weekend hobbyist I have made a few changes to my shop (a commandeered portion of my parents basement). A little more space, some rearranging, and getting rid of junk should help make this space more effecient and usable.
Here you can see the other side of the space I use which is full of my familys stored items. YAY for shared space. At least I don't pay rent.
The General layout of the shop
The newest area of the shop is a combined Finishing and Metal working area (also where I sharpen tools). It is an L shaped section of cabinets (repurposed after a Kitchen remodel), non of the cupboards actually contain any woodworking or construction supplies (more family storage).
Left to right; lapping plates, machinist vise, saw vise, high speed grinder.
In back all my finishes I keep in stock.
The sharpening station. The tub holds my stones submerged in water so they are always ready to go.
Tool Chest for metal working tools (files, punches, cold chisels, etc.)
Next is my computer/ drafting station. This area see little use and will probably in the future be removed to make space for a bandsaw. I do most of my design work upstairs on a small portable drafting table and on a larger desktop computer.
Above my laptop is a Small bookshelf (made of scraps) to hold all my woodworking books and magazines.
Next up is tool storage above and left of my drafting station. I have two boards of peg board hanging of the basement framing, eventually I would love to have something more like this or like this, but for now this works. I've got everything from wrenches to planes on these boards. I do like that the peg board is easy to rearrange to change with new tools. I still need to move a few things around to make them easier to get at, and I would like to group similar tools together. Small side note the long shelf is a piece of baseboard on brackets, YAY for recycling.
Next, below the peg board is one of my two benches. This is the first bench I ever built, it doesnt work great for some tasks but this is where I started my woodworking journey. Now this bench will be used for power tool work and assembly.
The Bottom Shelf holds mostly power tools (ie. planer, router, sanders) but will eventually store all my on site tools as well (once I purge all the crap out from under there).
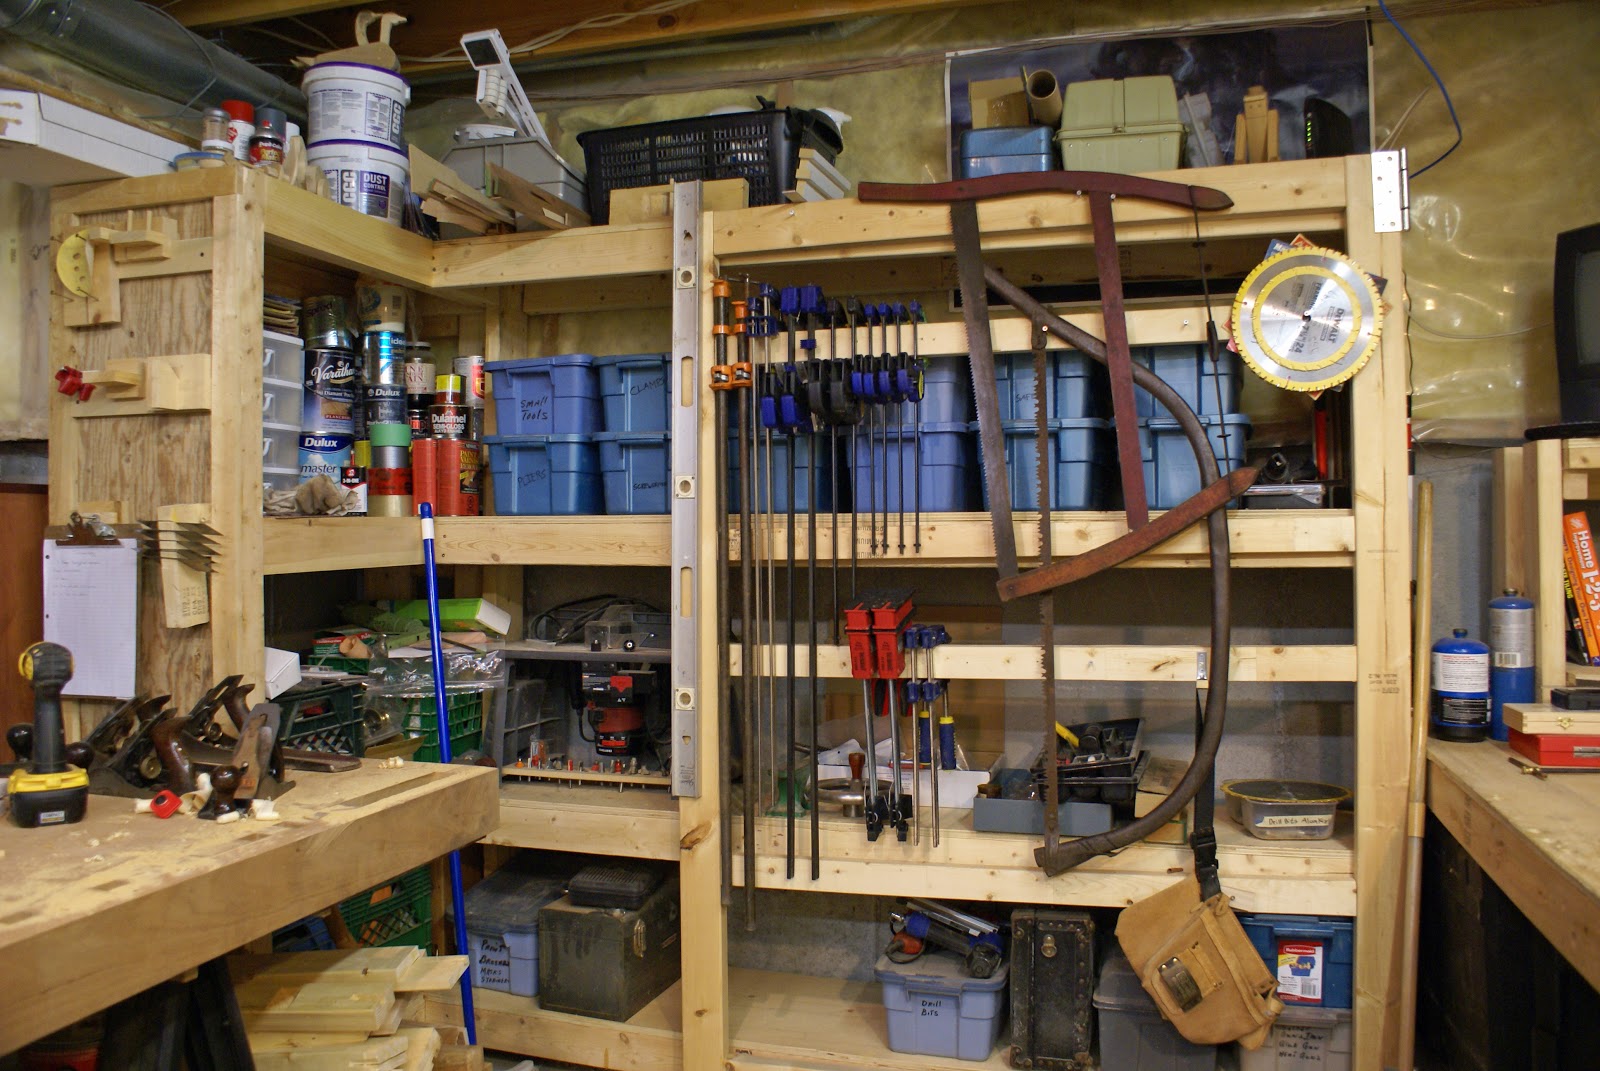
Next up shelves of tools. Pretty self explanitory, most of my tools are stored on these shelfs, as well as supplies and hardware. The gate on the front which holds the clamps is on hinges so that it get out of the way when I need somethign from in behind.
The left side of the shelving unit also has some french cleat storage.
Finally we come to my new bench (or bench in progress). A more traditional bench, with a tail vise and eventaully a leg vise.
The workbench half done. Top needs to be flattened.
And a base made to get it off the saw horses.
A bin for shavings my saw bench and bench hooks.
Lumber storage was a problem in here. I have a small are of 8 foot high cielings where I store any sheet goods and long sections of lumber.
I used the exposed joist bays to store some smaller pieces of lumber.
Finally we have my table saw station. I used a small portable Dewalt table saw on a work mate table, and for the most part it works great. I am right now refurbbing an old 8 inch Delta contractor saw which will become my main table saw and the Dewalt will be my own site saw (as it should be).
A mobile base would be nice.
So there you have it my shop in all its glory. It is a wonderful place that I love working in. It is constantly evolving and changing to fit my needs. If you want to see more of it leave a comment or any questions same deal and I will get back to you.
Cheers
Hans Christopher
Wednesday, 21 September 2011
One Ugly Duckling
So with no school today I had the whole day to spend down in the shop. I started by continuing on my sawbench. I glued up the front legs and stretchers (wrong way first...I hate do overs), and while that was drying I continued onto some other shop projects.
I built a mitre shooting board a while back during the cabinet door project and now I have gone onto build a standard shooting board, and I screwed it up. The issue is that when I was planning the end grain (planning sapele end grain is not as bad as I thought) I chamfered the ends of the fence block so now when I plane a piece up against the fence the work piece continuously blows out. It is fixable so when I can I'll take off the fence and plane away the chamfer.
The big accomplishment today though was completing the ugly duckling. What is this ugly duckling I speak of; well it is one ugly tool chest that I now having sitting in my shop. The chest is a simple construction of all the spare junk I had in the shop, the chest is meant to hold and protect my complement of hand tools (or at least most of them). It is 2'x1'x1' box made of pine and maple with two tool tills.Jack Plane
Jointer Plane
Block Plane
Router Plane
Shoulder Plane
Spokeshave
Brace & Bits
Hand Drill
Fret Saw
Beading Tool
Mallet
Rasps & File
Scrapers
Marking Knife
Dovetail Markers
Square
Level
Ruler
Dividers
Measuring Tape
And other miscellaneous items
Cheers
Hans Christopher
Subscribe to:
Posts (Atom)